How to Compress Photos Before Uploading to Social Media
Stop platforms from ruining your picture quality. Learn how to compress photos easily before uploading and keep your images looking perfectly sharp.
You know that exact feeling. You are on a beautiful vacation or attending a wonderful family event. The lighting is absolutely perfect. You pull out your phone or digital camera and snap a breathtaking picture. The colors look vibrant, the faces are clear, and you cannot wait to share this moment with your friends online. You open your favorite social app, hit the upload button, and wait eagerly for the likes to pour in.
Then, you look closely at your published post. Your heart sinks. That gorgeous, crisp sunset now looks like a blurry painting. The faces of your friends look muddy and pixelated. The vibrant colors seem washed out and dull. You sit there wondering what went wrong. Your camera is fantastic, so why does the picture look so terrible on the internet?
The answer comes down to file size. Social platforms are incredibly strict about how much data they allow on their servers. To fix this frustrating problem, you must learn how to compress photos yourself before you ever hit that upload button. Doing this simple step completely changes how your pictures look online.
The Hidden Reality of Social Media Servers
To understand why your pictures lose their magic, we need to look at how social companies operate. Think about how many millions of people use these apps every single day. Every second, users are uploading millions of heavy camera files. Storing all of that massive data costs these companies billions of dollars in computer server space.
To save themselves money, these platforms use aggressive automated systems. When you upload a massive five megabyte picture, the app intercepts it. Their internal software instantly crushes your file to make it as tiny as possible. They do not care about preserving your beautiful memories or keeping your brand looking professional. They only care about saving server space. Their automated tools are brutal and will strip away vital details, colors, and sharpness to force the file weight down.
Why You Need to Take Control
If you let the platform do the heavy lifting, you surrender all control over how your final picture looks. The secret to keeping your media beautiful is beating them to the punch. When you compress photos before you upload them, you hand the social app a file that is already perfectly lightweight.
Because the file is already small, the platform's aggressive system simply ignores it. It passes right through their filters without being touched or destroyed. You retain total control over the clarity and quality. This is the exact method that professional photographers and popular digital influencers use to keep their feeds looking incredibly sharp and stunning. You do not need expensive software to do this. You just need a solid routine and a good online tool.
The Big Advantages of Pre-Optimizing Your Media
Taking two minutes to prepare your pictures might feel like an extra chore at first. However, once you see the incredible results, it will become a natural part of your daily workflow. Here is exactly what you gain when you take control of your media files.
- Pristine Visual Quality: Your pictures stay crisp, clear, and totally professional looking.
- Faster Upload Speeds: A lighter file shoots across your mobile network instantly, saving you time.
- Reduced Data Usage: You will burn through far less of your monthly mobile internet plan when uploading.
- Better Audience Engagement: People are much more likely to like, share, and comment on a high quality visual.
- Stronger Brand Trust: Business owners look much more credible when their products are displayed sharply.
Fixing Your Dimensions First
Before we talk about file weight, we have to talk about physical size. Modern phone cameras take massive pictures. A standard shot might be four thousand pixels wide. Social feeds are usually only about a thousand pixels wide. If you try to force a massive picture into a small digital box, the app will shrink it and ruin the quality in the process.
Your very first step is to use an Image Resizer. An Image Resizer changes the actual physical width and height of your picture to match the platform rules exactly. If the app wants a picture that is one thousand pixels wide, you resize your picture to exactly that number. By giving the platform the exact dimensions they ask for, you stop them from altering your hard work.
The Ideal Sizes for Different Platforms
Every single social network has different rules for how they display visual content. Using the right dimensions makes a massive difference. You can use this simple guide to figure out exactly how wide and tall your pictures should be before you begin the optimization process.
| Social Platform | Post Type | Best Dimensions in Pixels | Best File Format |
|---|---|---|---|
| Square Feed Post | 1080 by 1080 | JPG | |
| Vertical Story | 1080 by 1920 | JPG | |
| Standard Timeline | 1200 by 630 | JPG | |
| Feed Image | 1200 by 675 | JPG | |
| Professional Post | 1200 by 627 | JPG |
Choosing the Right File Format
You might notice that the chart above recommends the exact same format for every single platform. That is not an accident. The format you choose plays a huge role in how the final result looks. Many beginners make the mistake of using PNG files for their colorful photographs.
PNG files are incredibly heavy. They are designed for transparent business logos and flat computer graphics. When you upload a heavy PNG photograph, the social app panics and crushes it terribly. You should always save your camera shots as JPG files. The JPG format is universally loved by the internet because it holds beautiful colors while keeping the actual file weight naturally low.
Using Our Simple Platform
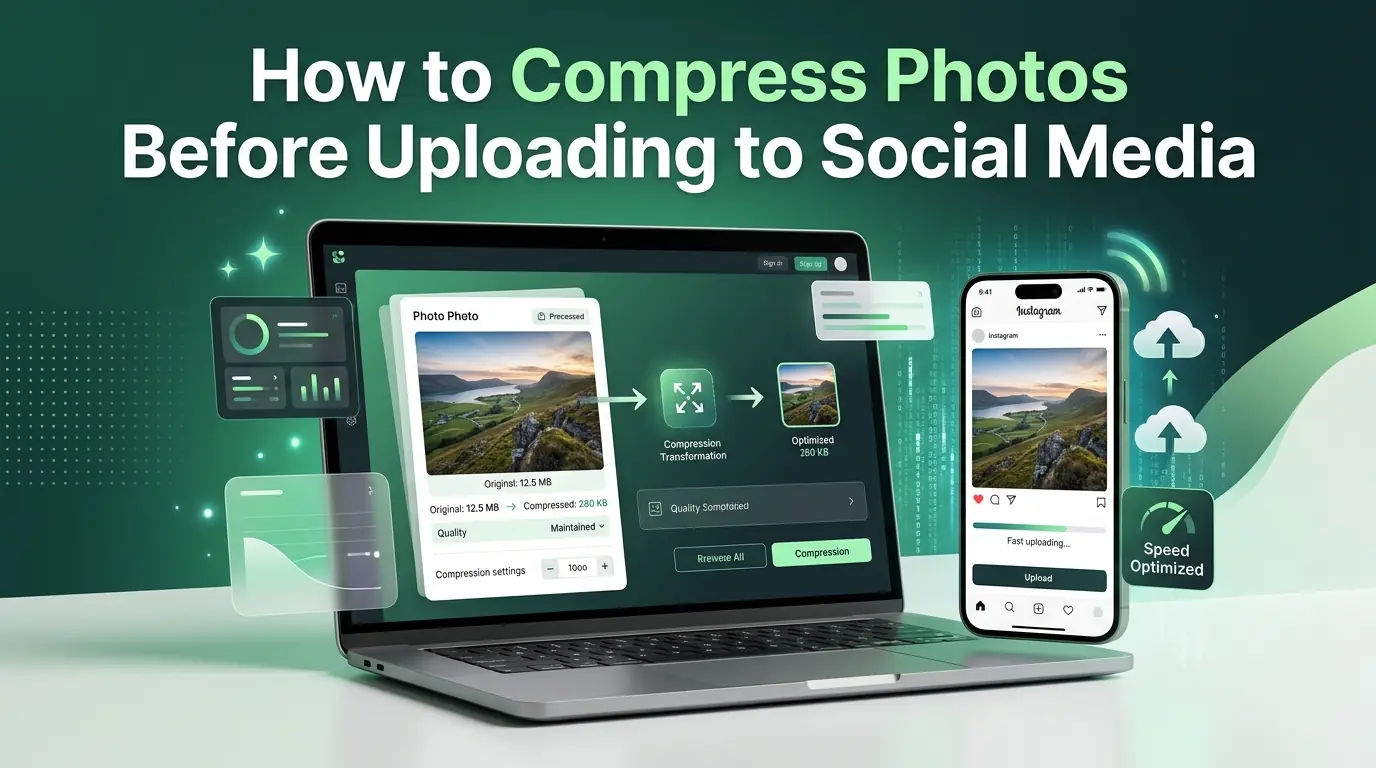
Once your picture is resized to the right dimensions and saved as a JPG, it is time for the final magical step. You need to reduce the actual kilobyte weight. This is where you use a dedicated tool to compress photos properly. You want to use a system that removes hidden invisible data without touching the visible beauty.
This is exactly why we built multicompressor.com for you. We created a tool that is incredibly easy to understand and use. You do not have to download any confusing applications or pay for monthly subscriptions. You just open your internet browser and visit our website. The screen presents a large uploading area that is impossible to miss.
You simply drag your pictures into that box or tap it to select files from your phone gallery. Our smart system instantly goes to work. It scans your picture, finds all the useless hidden camera data, and gently removes it. A few seconds later, you get a brand new version of your picture. It looks exactly the same to your human eyes, but the file weight is drastically smaller. You then download it and upload it directly to your favorite app. The results will honestly shock you.
Common Mistakes You Must Avoid
Even with the best tools, it is easy to make a few simple errors. One major mistake is compressing the exact same picture over and over again. If you run a picture through our tool, download it, and then run that new version through the tool again, you will ruin it. Every time you compress a file, a tiny bit of data goes away. Doing it once is perfect. Doing it three times will create a blurry, blocky mess. Always start with your original camera file.
Another common error is applying heavy color filters before you optimize. Social apps have their own color filters. If you add heavy contrast and fake vintage colors on your phone, then compress it, and then add another filter on the app, the colors will break. Keep your original picture as natural as possible. Compress it first, and then apply a gentle filter inside the app right before you post.
Why This Matters for Small Businesses
If you run a business, you simply cannot afford to ignore this process. Your online profile is your digital storefront window. When a potential customer visits your page, they judge your credibility within two seconds. If they see blurry product photos, they will assume your business is cheap and unprofessional.
Selling a beautiful handmade necklace or offering high end consulting services requires crisp presentation. You want people to zoom in and see the fine details of your work. By taking a few extra moments to optimize your media, you elevate your entire brand. People trust businesses that look clean and sharp. It is the easiest, cheapest marketing trick in the world.
5 Frequently Asked Questions
1. Do I need to pay for a tool to compress photos?
No, you absolutely do not need to spend any money. You can use our platform at multicompressor.com entirely for free. We provide premium optimization tools without charging you any hidden fees or forcing you to buy annoying subscriptions.
2. Will the compression process change my image colors?
When you use a high quality optimizer, your colors will remain totally vibrant and true to the original shot. The tool only targets the hidden data that your eyes cannot see, ensuring your beautiful sunsets and portraits look completely natural.
3. Should I compress photos on my computer or my phone?
You can easily do it on either device. Our website works perfectly on both desktop computers and mobile phone browsers. You can snap a picture on your phone, open our site in your mobile browser, optimize it, and upload it to your app immediately.
4. What happens if my file is still too heavy after one pass?
If the file is still a bit heavy, you should double check your physical dimensions first. Using an Image Resizer to reduce the width and height is usually the best way to drop the remaining weight without causing any ugly blurring or artifacting.
5. Can I fix blurry photos that I already uploaded last year?
Unfortunately, you cannot fix photos once they are already posted on the platform. The social app has already destroyed the data. To fix your old posts, you will need to find the original heavy files on your phone, optimize them properly, and upload them as brand new posts.
Wrapping Up Your Digital Journey
Taking beautiful pictures is only half of the journey. Making sure those pictures survive the internet is the other half. It is deeply frustrating to watch a greedy automated server ruin your favorite memories. However, now that you know exactly how the system works behind the scenes, you never have to deal with blurry uploads again.
By remembering to resize your dimensions and compress photos before you share them, you take the power back into your own hands. It takes practically no time at all, especially when you use a fast, reliable tool like multicompressor.com. Build this simple step into your daily routine. Your friends, your followers, and your business customers will immediately notice the incredible difference in your visual quality.
Related Articles
How to Compress Images for Faster Website Loading
Learn how to use an online image compressor to speed up your website. Reduce your bounce rates, boost mobile performance, and improve your search rankings.
How to Optimize Images for E-Commerce Product Pages
Learn how to optimize images for your e-commerce product pages. Boost your page speed, improve user SEO rankings, and increase your online sales today.
Best JPG Image Compressor Tool 2026
Speed up your website today with our free JPG image compressor. Easily reduce large photo file sizes without losing quality at multicompressor.com.